Montag, 21. November 2011

Frosty the snowman

Hi again,


This morning I found an old Christmas window color book with a very cute little snowman. 
I copied the picture of the snowman and worked it out of paper.  


Frosty


Later this day I made a Christmas card and the main decoration of it is this snowman.
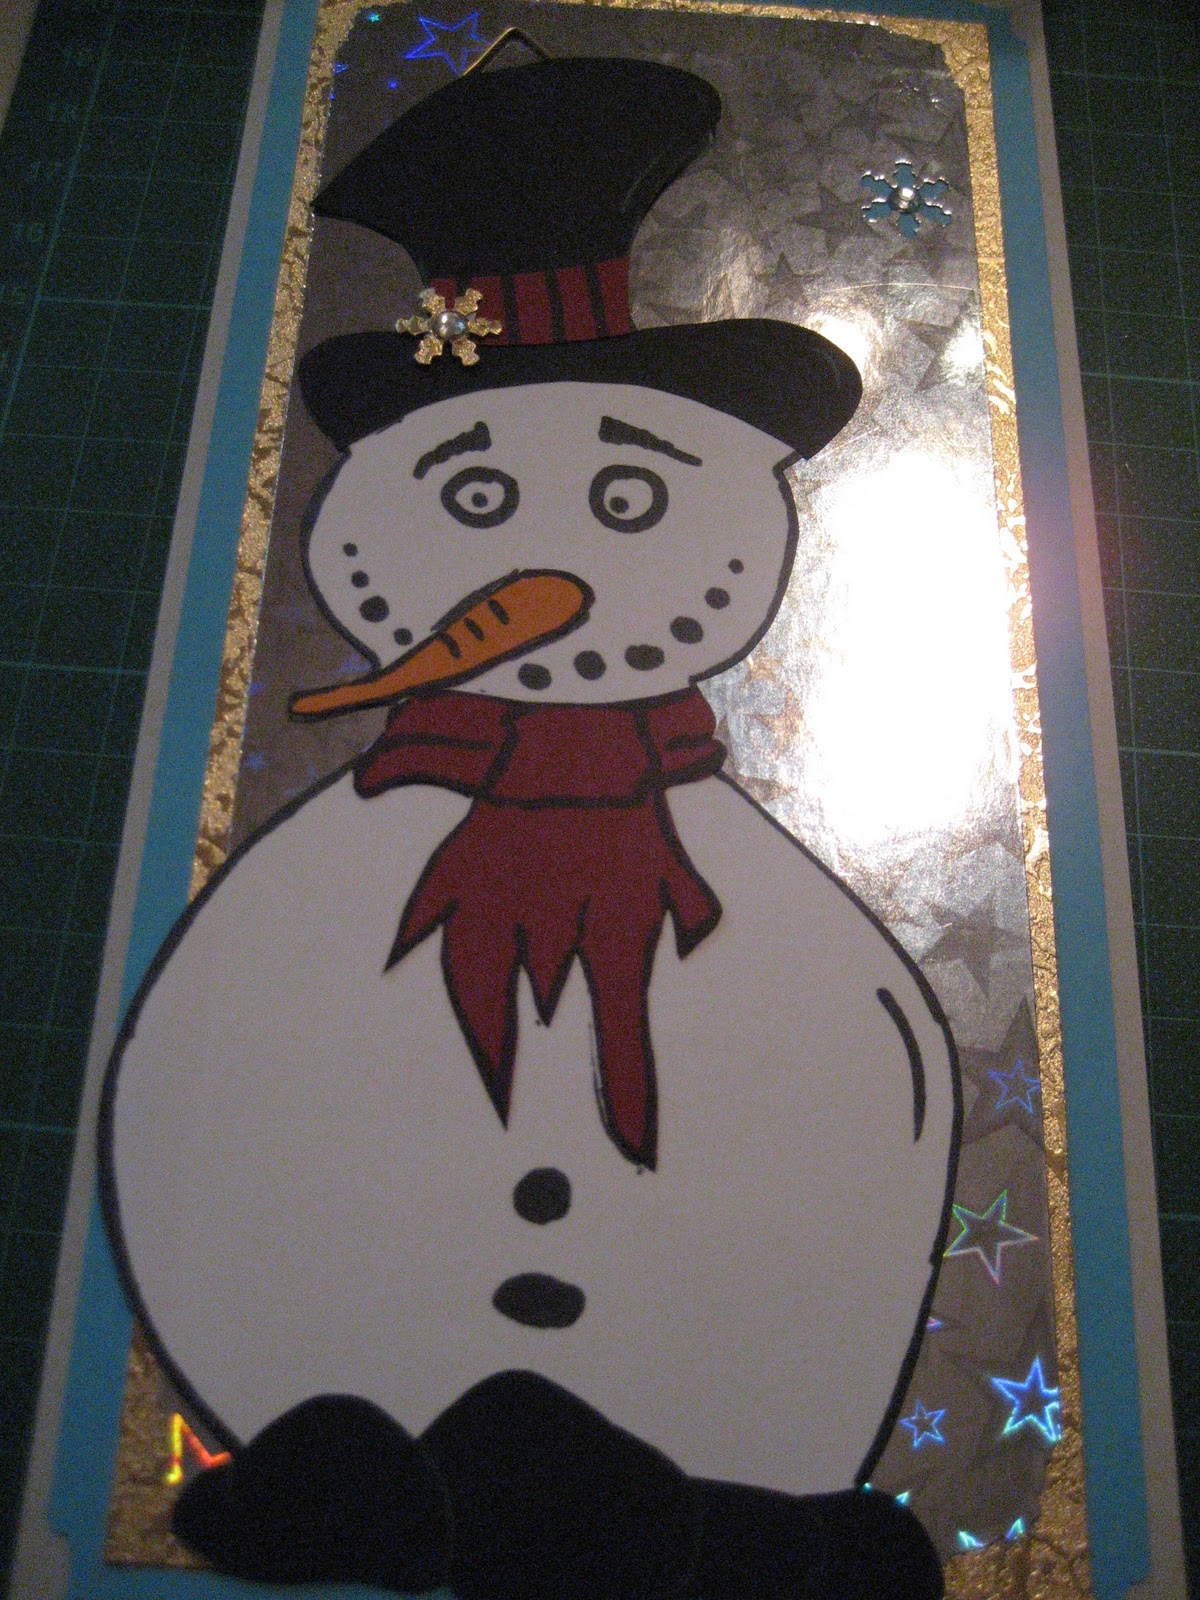


Frosty on the card
I love this card! It's so simple - the only embellishments on this card are the cut snowflake in the background and the one on Frosty's hat. And both are decorated with a flat back rhine stone in crystal clear. That's it!

Hope you like it too,
Bettina

Another box

Hello,


Yesterday night I started to ground my old wooden box with my red and white acrylic colors. And today I gave it a finish with the flower and bug pictures. I cut them out of an old napkin and fixed it with clear acrylic paint that has a shiny look after it's dry.
So, here is a little picture of it:
front side of my box
Today I tried out something new:
I took some sheets of paper (all in the same size) and fixed it together with a piece of duct tape on one side. Than I made a hardcover front and backside and fixed it once again with some adhesive. 
The cool thing is that you now can open the little jotter and write something inside. And you can also pull out a sheet as like as a scratchpad.
I don't like the design of my jotter but it was an experiment and I did not know that it will work. Nevertheless I'd like to show you the book on a picture, although it's ugly *lol*
My "ugly" jotter 

The open jotter


I'm quite sure that I'll do some more of these books as a gift for Christmas or so because you can use all kinds of papers and materials, you can decorate the outside with all scrapbooking and card making options and ideas you have and there's no limit in which size you work it out. So everyone needs something to write down notes - everyone can need a little scratchpad.


Yours,
Bettina

Sonntag, 20. November 2011

Old Boxes with a New Dress


Hello Everyone,


The days ill at home and not allowed to got outside is the time I use for my crafty ideas :)


Yesterday I've started to work on my boyfriend's Christmas calendar for this year but right now I would need some more material so I put this project aside. 


Later that day I made some boxes. 4 little ones (not very spectacular) in an Origami technic. Another one I made even also in this technic is a little bit bigger with a nice flower on top and some ribbon (I think that's a very cute one!):


open box filled with some stuff
Top of the box with the flower


Today I thought I redesign some of my old boxes. The first one is an old picture-box in some ugly yellow and blue color. Colors I don't like in my room. I have 90% shelfs as a storage in my room that's why I always take care that everything fits together. Now this box is colored in white and decorated with a spooky castle, a ghost and a bat... of course everything in the colors of my room! Have a look:

The front side of my new spooky box

with a red flower embellishment


the backside of my box with a bat ornament 


The second box is an old shoe box that I've grounded in red and white. After it was dry I've put on a snowman and some little silver snowflakes with flat grounded rhine stones in the middle. Here I show you only one picture 'cause the bottom of the box is just red. 

My winter box
So as you can see I was quite busy these days :)
Hope you like my new projects and if you have any questions about material, technic or such a thing don't be shy and leave a comment.

Good bye,
Bettina

Mittwoch, 16. November 2011

cupcake card

The last week I was cutting and cutting and cutting...
It'r so much fun. Just put the cartridge in the machine type whatever you want to be cut and than you wait  a little bit - done :)
With my new cartridges (Rock Princess, Mini Monograms) I've decided to create this lovely, colorful birthday card. And than I did a little girly scull. It's so cute!!!


Cupcake Card

Materials:

  • cardstock in different patterns and colors
  • cricut machine and cartridges
  • white card
  • red polka dotted ribbon
  • glue
How to:
  1. I've sliced the "smile" phrase in green (Mini Monograms p. 122)
  2. I've cut the green and black foundation (p. 129, p. 126 Mini Monograms) and double glued it 
  3. I changed the cartridge and cut out all the single pieces for the little cupcake (Rock Princess p. 77). I fixed the pieces together and colored the cherry with my red glitter glue. After it tried I put it on the foundation.
  4. I took the white card fixed a piece of the flower paper the ribbon and the smile phrase on it. Than I put some 3D dotties on the backside of my muffin and set it on the card. ready!

Donnerstag, 10. November 2011

time for a new post...

Hi Everyone!


Today I thought I'm writing to all of you, because its been a while since my last post.


I've got so many things to do at the moment, that there is no time for crafting :-( ...what a bitty...


Today it's St. Martins feast with my kids group and I've got to prepare lots of stuff for December (presents, songs and other traditional things we are doing with the children in the kindergarden).
And of course I have a bad cold and feel really bead, so bad that I even didn't make something crafty although I have my new CRICUT machine since Monday!!!! 


This machine is awesome! Right now I'm waiting for my new cartridges but than I really get started...
Certainly I tried out all the different settings on my keyboard but as nice the cartridge font "George and basic shapes" is, as simple it is. Great to figure out the functions of the machine but not very scale - title is program!


Okay, hope you all have a nice 10th of  November. Here in Vienna its foggy but a nice weather for a little lantern walk in the afternoon!


If you have some experiences with the cricut machine (the original one), please let me know!


Bye,
Bettina

Dienstag, 25. Oktober 2011

something informative...

Since a while I publish all my posts in English. The reason is, that I'd like to stay in a dialog with lot's of people and English is a more known language than German.
Maybe posting in English helps me to find some readers and friends in the scrapbooking, card creating and paper crafting unit :)

 But now it's time to explain all my english speaking readers what my Site title "Papierlapapp!" means.
'Papier' is the german word for 'paper'.
And there is a statement people say in german that's called 'papperlapapp'. In English you would say 'fiddlesticks' or 'poppycock'
So "Papierlapapp!" is just a play on words :)

See you...
B*

2nd anniversary

Hello again my crafty friends,

This year I'm going to have the second anniversary with my boyfriend. And every time when I'm asking him, what presents he's valuing, he answers: "A little handicraft!" And that's the point why I thought I'll make him a card.
Of course every time I'm crafting cards I try to make a different one. This year my cards design is inspired by Halloween - have a look!


Materials:
  • different papers
  • ribbons, embellishment
  • tag punch, flower punch
  • clear stamps (owls, tree), stamp ink, etc.
  • glue

What did I do?
My card in beige was colored with stamp ink in yellow and orange. Than I've cutted orange pieces where I stamped the owls and trees on them. And I've inked the edges. 
From my purple sheet I punched out some tags. One is in the backside, between the orange pieces. The other three are fixed together so they are building one thick tag. I ripped the first two to create a used image. Here I've also colored the edges.
Furthermore I punched out the little flower from the top piece and put a stone in the middle. 
All this pieces are decorated with the ribbons and fixed on the card - finished!

In the inside I stamped some owls and then I wrote a nice message (because of my privacy I don't show you the inside part of the card).


Of course this card is not the only thing my boyfriend gets from me. But I'm afraid that he is going on my site before our anniversary *surprise, surprise*

Feel free to leave some comments,
Bettina


card or table lamp?

Hello Everyone!


For my last project I found the tutorial somewhere in the web but I've lost the Link. Nevertheless I'd like to share the pattern with you :)
It's very easy to do. First you have to cut out a lamp stand shape, e.g. on the picture below. When you're using a hard card stock one sheet of paper is enough. If it's thinner you may double the paper.


The second step is to cut out two pieces of a lampshade shape. Now you fix the shades on the front and backside of the lamp stand. If you make so you have to think that you crimp on one side so you can open the card.


Now it's time for decorating!  And a nice lamp shaped card is finished.


 Materials:

  • Paper
  • Cutting Map, Cutter
  • Glue
  • Embellishments


Hope you like it! 
Yours,
Bettina

Montag, 17. Oktober 2011

drawings

hello once again,

I love owls! They're sooo cute!
That's the reason why I've started to make my own owl-designs. They're a lil' worse right now but practice makes perfect!
Nevertheless I'll show you 2 of my little cute birds *lol*

Here they are...
Hi, I'm Birdie!
Hi Birdie, I'm Joe!


Hope you like it!

Bettina

gift tags

Hi Everyone!


Today I was making tags again. I love this little quick projects!
So, I'd like to show you some pictures of my tags.


Materials I've used:
  • 3" puncher
  • different sheets of paper
  • embossing tools for the snowflakes
  • gem stones & glue
  • ribbons
  • clear stamps and stamp ink 
  • little punchers (snowflake, flower, circle)


Here they are:


Winter Season #1


Winter Season #2


Birdy Birthday

I love my little birds

singing birds in trees


polka dot birds


Trick or Treat!
Yours, 
Bettina

Freitag, 14. Oktober 2011

My new christmas tags

Hello Everyone!


Because of my title I'm writing to you in English. Today I started a new project (Birthday prearrangements are done!) - Christmas tags! Holidays are coming ..


So, have a look:


Materials I've used:

  • paper (brown, light blue, yellow and red)
  • 3" tag shapes puncher
  • different little punchers (star, bell, snowflake)
  • ribbons (red polka dot, green, white)
  • clear stamps (snowman, christmas tree, santa claus)
  • gemo stones, star charm
  • glue tape
Hope you guys like it! Leave some comments or ask questions!!

Yours,
        Bettina*

Freitag, 7. Oktober 2011

Geburtstagsvorbereitungen


Hallo!

Ich bin schon ganz aus dem Häuschen: Mein Geburtstag steht vor der Tür! Und ich bin mitten in meinen Vorbereitungen für die Party. Für die Feier habe ich mir überlegt, dass ich diverse Goodies bastle, ein paar Einblicke kann ich schon jetzt geben aber zu viel wird noch nicht verraten!
Bin schon gespannt, ob ihr wisst, was es mit den vielen Hüten Aufsicht hat ;)?


Natürlich wird das Rätsel noch gelüftet - aber bis dahin müsst ihr euch noch gedulden, nicht, dass eine(r) meiner FreundInnen auf meine Seite schaut und weiß, was ich für kommenden Samstag alles plane! 


Ich sage nur so viel: Ich brauchte Unmengen an Papier, Stanzern und Kleber. Sowie Stempel, Buntstifte, ein Laminiergerät und einen Locher...


[Alle Bilder: Bettina P.]
Hier gibt es nun die Auflösung meines Rätsels: Aus den oben angeführten Hüten habe ich Getränkegutscheine für meine Geburtstagsparty am Samstag gebastelt ;-)

Hoffe, meine kleine Geschenke kommen bei meinen Gästen an!

Eure, 
Bettina
Das sind nur 3 meiner über 60 Bons

Auftrag ausgeführt!

Hallo liebe LeserInnen!


Ich hatte die Ehre für eine Freundin ein paar Karten zu gestalten. Darunter waren 1 Hochzeitskarte,
 2 Geburtstags- und ein paar Weihnachtskarten.


Die ersten Stücke sind bereits fertig und bereit veröffentlicht zu werden, also schaut selbst 
[Alle Bilder: Bettina P.]:


Geburtstagskarte "Rad"


Für diese Grußkarte habe ich auf transparentem Papier Fahrräder aufgedruckt, und auf der orange grundierten Karte mit doppelseitigen Klebeband angebracht. Verziert habe ich das ganze mit einem Leinenband mit diversen Blättern darauf. Als nächstes folgte dann ein Schild aus blauem Glitterkarton und nochmals Fahrräder (diesmal auf gelben Hintergrund) welches ich mit einem Happy Birthday-Schirftzug und der Torte versehen habe. Beides ist mit blauer Farbe gestempelt. Der Schriftzug wird von einem blauen Brad mit Schleife festgehalten. Die Torte ist mit 3D Dotties befestigt.


Die Hochzeitskarte ist in creme gehalten, mit zarten goldenen Bordürenstickern verziert und die untere Hälfte der Karte habe ich mit einem Scrapbooking Bogen in blau, creme mit Glitter beklebt. Dieses Stück wurde vorher noch mit meinem Bordürenstanzer gelocht und eine weiße Schleife angebracht. Das Highlight der Karte ist das kleine Schild. Dafür habe ich wieder mehrere Papier zurechtgeschnitten und übereinander geklebt und verziert. Das "Traumhochzeit in Las Vegas" -Schild habe ich aus dem Internet (es gibt anscheinend einen Film der so heißt). Die Birnchen des Schildes habe ich mit kleinen Sternchen beklebt.Dann noch ein paar Röschen und eine Hochzeitstorte in 3D.


Hochzeitskarte "Las Vegas"


Geburtstagskarte "Katamaran"

Für diese Geburtstagskarte war das Thema "Katamaran" gefordert. Hierfür habe ich die Karte mit Stempelfarben in blau und grün grundiert, eine weiße selbstklebende Bordüre angebracht und diese mit blauen Sternchen verziert. Den Katamaran habe ich aus dem Internet auf Fotokarton gedruckt und ausgestanzt und auf einem blauen Schild angebracht, welches mit einem grünen Band beklebt wurde. Aus dem selben Papier, wie eben das Boot, habe ich auch mein Geburtstagsschild gefertigt. Dafür habe ich den Schriftzug mit Rahmen ausgedruckt, dann in den Ecken Blümchen gestempelt (schwarz) und diese mit blauen Sternchen versehen. Das war's!


So, nun sind auch die anderen Karten fertig geworden. Dabei handelt es sich um diverse Weihnachts-Grußkarten. Farblich und vom Stil her konnte ich mich hier voll entfalten!
Eine meiner Lieblinge ist die rote Weihnachtsmann-Karte:


Diese Karte habe ich mit einem roten Papier ummantelt, dass auf der rechten Seite größer ist als auf der linken, so dass ich sie zuklappen kann. Als Verschluss habe ich einen Magneten angebracht und die Karte selbst mit goldenen Konturenstickern verziert. 


Dann dachte ich mir so, warum mache ich meine Weihnachtskarten immer den klassischen Weihnachtsfarben, also versuchte ich mich mal in anderen Farbvariationen. Aber seht selbst:


Dann noch zwei weitere eher klassisch gehaltene Karten:


Eure, 
Bettina

Donnerstag, 29. September 2011

Flip up Box

Hallo an alle LeserInnen!

Ich bin bereits am grübeln, wie ich heuer den Adventskalender basteln könnte. Also probiere ich diverse Schachtel- und Verpackungsmöglichkeiten aus.
Diesmal entschied ich mich für eine Flip up-Box. Das besondere an dieser Schachtel ist, dass sie fast ein bisschen aufspringt, wenn  man den Deckel absetzt.

[Alle Bilder: Bettina P.]


Dadurch macht es natürlich Spaß, sie sowohl innen als auch außen zu dekorieren. 
Meine Versuchs-Schachtel habe ich nach dem Motto "Liebe" gestaltet. Hier möchte ich euch nun noch ein paar Details zeigen. Unter anderem den Deckel und dann natürlich die ausgeflippte Schachtel mit dem besonders verzierten Schachtelboden. 

Der Deckel von oben 
Material:
  • Schmuckpapier
  • Bänder, Sticker und Dekomaterial
  • Schneidematte
  • Schere und Kleber
  • Schneidbrett
  • Falzbein


Ich hoffe, euch gefällt meine kleine Box!
Sie macht ganz viel Spaß zu machen und ist wirklich einfach zu gestalten!

Eure,
Bettina
So sieht die Box aus, wenn man den Deckel entfernt

Mittwoch, 28. September 2011

Geburtstagskarte für Samstag

Hallo zusammen!


Am Samstag steht wieder einmal eine Geburtstagsfeier an, also habe ich schnell einmal eine neue Karte gestaltet. 
Farblich passt sie zu meinem Geschenk und seiner Verpackung.


Für diese Karte habe ich eine weiße Karte mit dem gelb-goldenen Karton grundiert und dann aus einem Scrapbooking Block den Blumenstreifen ausgeschnitten und den Kreis ausgestanzt. 
Als Highlight setze ich noch ein kleines Bändchen mit Schleife auf die Karte und einen weißen Konturensticker.
Der Schmetterling hat einen 3D Effekt, da ich ihn auf den Goldkarton gesetzt, ausgeschnitten und die Flügel geknickt habe. 
Dann noch links und rechts 2 gelbe Strass-Steinchen und fertig ist die Karte!
Aber natürlich war das noch nicht alles ;-)
Wenn man die Scheibe zur Seite dreht, findet man einen kleinen "Happy Birthday"- Schriftzug und ein paar Kerzen! aus silbernen Konturenstickern (leider hatte ich momentan keine andere Farbe zu Hause)


Ich hoffe euch gefällt mein Karte! 
Mir hat es vor allem der Schmetterling angetan, weshalb ich ihn auch noch einmal extra abbilden muss! 


[Alle Bilder: Bettina P.]
Eure, 
Bettina