Dienstag, 6. März 2012

it's a boy


The idea of this card was just born. Because since this morning a friend is mother of two and I thought it would be a nice touch to send her a baby card.
It's the first time for me crafting a card about this topic but it's pretty good I think :)


wedding day

Hello!

One of my friends ordered (as so often! thanks a lot!!) a card for her office. Because a colleague is going to marry. My charge was to give the card a classic look everything else was left on my own device. 
Normally when I see a classic looking wedding card it's white or champaign with some glittering details and a little bit of gold. I gave my card a bit more color and I think it's really romantic :) 
Hope you too?!?
Thanks for visiting my site, 
B*

The main detail of my card

Sonntag, 4. März 2012

paper blossom (tutorial)

Have I ever told you that I love flowers and that I'll always create flower decorations, accessories etc.?
Okay, now you know :)

Yesterday while I was crafting I thought of doing my own paper flowers. And I created some of them. They're easy to do with a nice effect!
First I show you one of my little blooms and than I'll try to explain how to do.

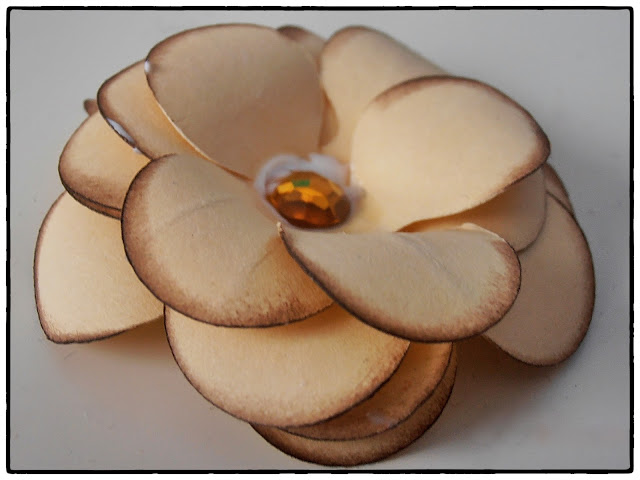
I'm sorry for the glue spots. It's a very fresh pic ;) but in the end the glue will dry crystal clear!
For the flower above I was using 4 pieces of punched*  paper flowers in this
shape:

All of this pieces are inked at the edges and turned in with a round embossing tool. 

Next step is to make a cut from the edge to the center point. I've done this with 2 of my flowers. When you now overlap the first and the last leave you'll have a lovely round flower shape with 4 leaves. Don't forget to fix them with some adhesive!!
Now it's time to fix this two 4-leave-flowers onto one with 5 leaves - now a lovely blossom exists :))

The last step is to cut the fifth flower into 5 single leaves and to glue them in the center of the paper flower. I use liquid glue here.

As a finish I like to put a gem stone or button into the middle. That's it! 
If you change the shape, size and colors of your flower you can create tons of lovely blossoms!!!!

Materials needed:
  • Paper
  • ink color
  • embossing pen
  • adhesive and glue
  • gem stones or buttons
  • puncher, shape cutting machine


Try it out and let me know about your experiences!
B*

*if you don't have a puncher or shape cutting machine, you can also draw one flower and use it as a template to cut with scissors. I'm sure you'll find such a shape also in the internet for free :)

foretaste of spring


Hello :)

Use my time ill at home once again to update my blog. Yesterday I made some new cards. They're very spring influenced. The idea came up because someone special has birthday. I'm not sure yet which card I'll give to my friend...


Enjoy,
B*

Samstag, 3. März 2012

window picture


gift boxes

Here you can see 3 different gift boxes. One for halloween treats and the other 2 are maybe for some little chocolates or a small jewel. 


Romantic Easter

Hi everyone,
This season I'm crazy on creating Easter decoration. The idea of this year was mixing up different materials.


Materials:

  • styrofoam eggs
  • acrylic paint
  • paper punch "flower"
  • paper
  • pearl maker painting pen
  • little fixing pins
  • gem stones
  • ribbon 


First I colored my eggs in pink. While they were drying I've punched lots of paper flowers in. Later I fixed them with the pins  in different patterns on the eggs. The pearl maker pen and the gem stones give this eggs the romantic finish. after drying again I made a little bow to hang them on my pussy willows. 
Hope you like it!


some more cards...


Pictures say more than words. So relax and have a look on my newest card projects.
I wish you all a fabulous day!   
Hope you enjoy :)

B*


some little detail of my" lovely Birthday"
 card

Freitag, 2. März 2012

goodies

I made some goody-bags for the costume party in Kindergarten. This years' theme was *points*
And I've tried to figure out the points on my bags.
 Here is my result:


spring wall!

Hi to YOU!

It's been a while since my last blog, but I'm too busy with my new job and all the crafts I'm working on for the job. In the end it's less time for my private crafts. Neverthelss sometimes I find some time :))

What you see on the picture below is my new butterfly wall. I made this stickers by myself using the provocraft cricut machine.(I love it so much!!!) 
I've cut out lots of butterflies in different sizes and fixed them on the wall. I really really love them! It's just that one little thing that gives my room something special! Hope you all enjoy it! 

Bye, 
Bettina